You have installed WordPress and now it’s time to configure the settings. Let’s go over your WordPress settings and a couple of important plugins you should install. I know by looking at this you may feel overwhelmed, but don’t worry it’s very straightforward and would probably take about 15 minutes or so.
Login to your WordPress dashboard and let’s get going.
Your Profile
The first thing you should do is update your profile information.
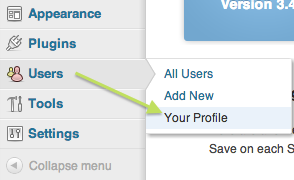
1. Scroll down to “Users” and select “Your Profile.”
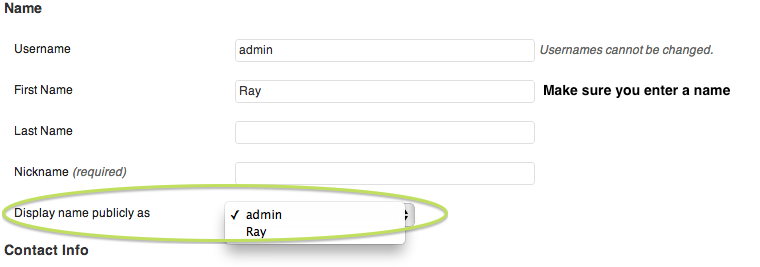
Enter your name (real or pen name) then change “Display public name” and choose how you want your name to appear. I recommend you also enter a short bio at the bottom of the page, this will show up on your posts.
Settings
We will scroll down to “Settings” on the left hand side and work our way down this list next.
1. General Settings: There is not a lot you need to change here, basically make sure your site title as well as your tag line are on there. “New User Default” role should be “Subscriber”. Set your Timezone and you should be fine.
NOTE: Make sure you click on Save Changes at the bottom after every change, before moving to the next setting.
2. Writing: Again, unless you are trying to do something fancy you don’t need to change a lot here. Scroll down to “Update Services” you should see http://rpc.pingomatic.com/ already listed, but you can list more ping services. This basically allows allows WordPress to notify update services every time you publish something new.
You can click on the “Update Services” link in WordPress to get additional ping services to add.
3. Reading: You will not see a lot of options here, but there are a few important settings.
- Front page display: By default it should be “Your latest post” this way your home page will always have your newest post, alternatively you can change it to a specific page. For example if you want the home page be a “Welcome” page you can create that page then come here and select that as your front page. As a new blog I would recommend you leave it as your latest post.
- For each article in the feed show: Here you have an option to either show your full article or only summary in your feed. I personally believe that if someone makes an effort and subscribes to your feed, they should get the full article and not just a summary. Some believe summary is sufficient and force the reader to click on the link to come back to your site. At the end it’s your call, I have all my blogs on Full.
4. Discussion: There are a few important settings in here as well.
If the first option is checked, it will notify other blogs when you link to them. It’s a good idea to have this checked. Every time you link to another blog they will be notified and chances are they will click on the link and check out your blog.
The second option is similar to the first, but in this case it notifies you of any link backs. I would also suggest you keep this on, every time someone links to you, you will get a notification.
Third option is in regards to comments.Do you want people to be able to leave comments on your posts or not? Although some blogs don’t allow for comments, most do. I would recommend you have this checked as well. If there is a specific article you don’t want to allow commenting on, you can change it within the post or page.
The second section concerns comments, here are the settings I would recommend. Some bloggers only allow comments for registered users, however I don’t think that is a good idea as it will turnoff readers. I never comment on a site that requires registering.
For the most part I would leave the rest here at the default options.
5. Media: I don’t think you need to make any changes here, just leave the default.
6. Privacy. Unless you don’t want to be found in search engines (for whatever crazy reason you may have), you should make sure the first option is selected to allow search engines to index your site.
7. Permalinks: I think this is the most important change you will have to make. There are several options for how you want your permalinks, some people choose to have the date in the URL, others choose the category. However, for SEO and aesthetic reasonI highly recommend you select “post name” as your permalink structure. With post name your URL will simply be your post name or anything else you want. http://myblog.com/my-new-post instead of http://myblog.com/2012/04/03/my-new-post.
Plugins
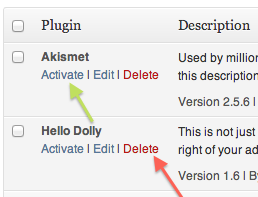
We will be discussing plugins more in another session, however I want to look at two important plugins you should install now. When you go to “Plugins” and “Installed Plugins” you should see Aksimet and Hello Dolly. Hello Dolly serves no purpose so just delete that.
Aksimet– Is a spam filter, and you will be thankful you installed and activated it. It basically prevents spammy comments from appearing on your site. Trust me there is A LOT of that, even for a new blog. You will need an API Key for this, so just click on the link provided and get your API key than enter it in the configuration page. That’s all you have to do for this.
Cache Plugin-A cache plugin basically will load your site faster for readers by caching static files. Don’t worry about the technicalities of it, all you need to know is that you NEED a cache plugin. There are several available, the two most popular plugins are W3TC and WP Super Cache. I am using both and they work fine, I suggest you install WP Super Cache because it is a bit simpler.
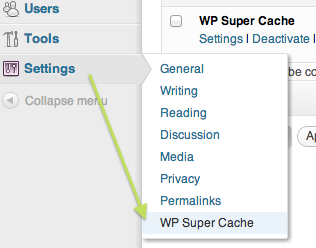
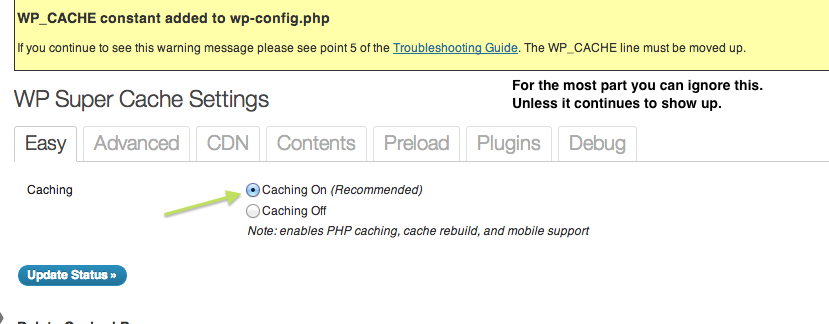
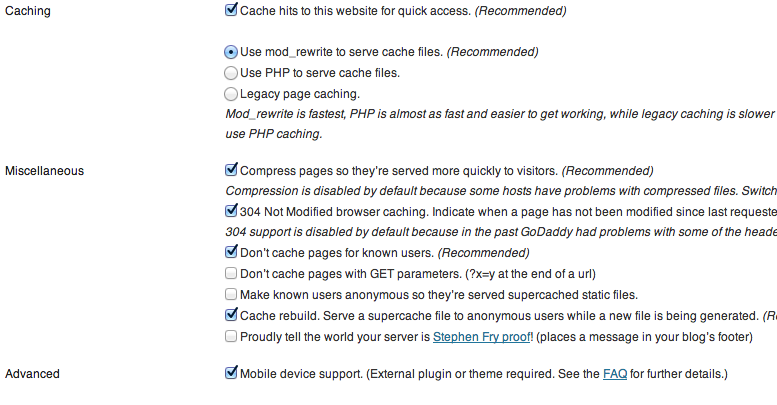
1. Go to your Plugins and click on “add new” and search for WP Super Cache it should be the first one on your list, click on install. When it is installed and activated you go to “Settings” and “WP Super Cache” to set it up. I will not get into details, but just provide you with suggested settings.
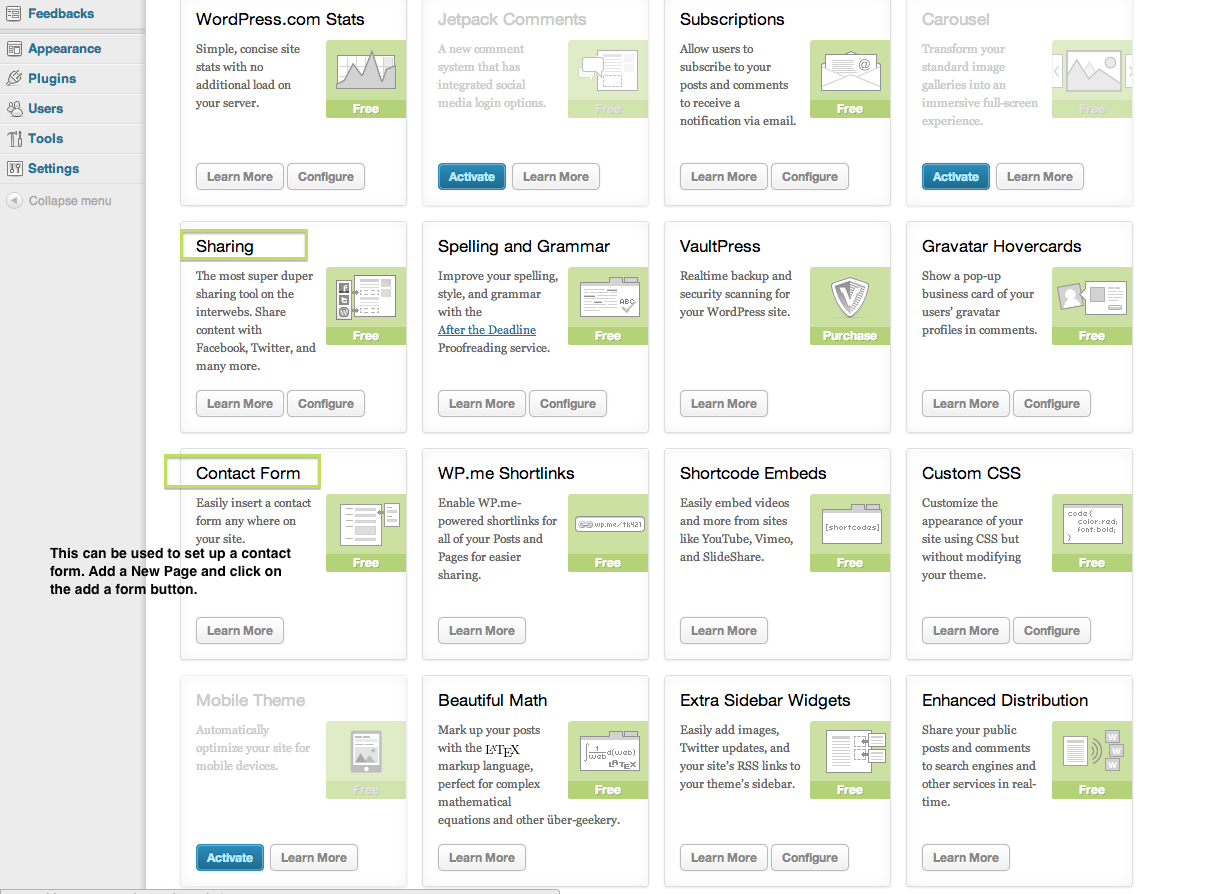
Jetpack-Jetpack is a neat little tool provided by WordPress.com, it’s a package of tools that you might find useful. I think the most important one is WP stats, which provides you with stats such as visitors, keywords, clicks etc. You will have to add a new plugin again, the same way you did with WP Super Cache. When it is installed you need to connect it to your WordPress.com account, so just follow the link that will appear on top of your screen and login or register for a new account. When installed, you will be taken to the Jetpack admin page. You can check each tool out and see what you want installed. I would also recommend “Sharing” this will place social media buttons either at the bottom or top of your post (whichever you choose) so that readers can share it.
That’s everything, now you are all set! These are just the basics, we will discuss more plugins and customization in a another session.
Questions or comments email me!




Recent Comments